A covered patio extends your living space and shields you from sun and rain, but the design choices matter more than you’d think. Whether you’re working with a tight backyard or sprawling acreage, the right covered patio design balances aesthetics, function, and durability. In 2026, homeowners are moving beyond basic wood pergolas into hybrid structures that blend shade, weather protection, and architectural appeal. This guide walks you through the key decisions: choosing between pergolas and solid roofs, picking materials that last, planning layouts that work, and adding the lighting and ventilation that turn a patio into a true outdoor room.
Table of Contents
ToggleKey Takeaways
- Choose a covered patio design based on your actual use: open pergolas for light and airflow, hybrid systems for adjustable coverage, or solid roofs for year-round weather protection.
- Material durability depends on your climate and maintenance commitment—wood needs yearly sealing, aluminum requires minimal care, and metal roofing lasts 40+ years with almost no upkeep.
- A comfortable covered patio layout requires at least 16×16 feet for furniture and movement, with posts spaced 8–12 feet apart, and a minimum 7-foot 6-inch ceiling clearance per building codes.
- Plan electrical and lighting circuits during framing—recessed soffit lights and hardwired fixtures are more reliable than string lights, and most patios need 8–12 watts per square foot of ambient lighting.
- Incorporate ventilation from the start through ceiling fans, cross-ventilation gaps, or louvered panels to prevent heat trapping and moisture damage in solid or hybrid covered patio structures.
- Start with a basic pergola ($1,500–$3,000 for materials) and add upgrades in phases to spread costs and test the space before committing to a permanent roof.
Choosing the Right Patio Cover Style for Your Home
Your cover style sets the tone for the entire space and determines how much shade and weather protection you’ll actually get. The choice comes down to three main categories: open designs (like pergolas), hybrid systems (partially covered), and fully enclosed structures (patios with solid roofs). Each has trade-offs worth understanding before you commit to a design.
Open designs offer maximum airflow and a light, airy feel, they’re visually less imposing than solid covers. But they don’t block rain or provide serious shade in direct sunlight. Hybrid systems bridge the gap: motorized louvered panels, shade sails, or retractable awnings let you adjust coverage based on weather and time of day. Full coverage, a solid roof, gives you complete protection and opens up year-round use, though it requires more structural support and careful planning around drainage and ventilation.
Think about how you’ll actually use the space. If you’re hosting summer gatherings where people drift in and out, a light pergola with climbing vines works. If you need a reliable spot to relax on weekends regardless of weather, you’ll want more substantial coverage.
Pergolas vs. Solid Roofs: Weighing Your Options
Pergolas are open-beam structures, typically featuring 2×6 or 2×8 rafters spaced 12–16 inches apart. They cast dappled shade and let rain through, so they’re decorative and cooling without being waterproof. Installation is straightforward for a handy DIYer with basic carpentry skills: set 4×4 posts in concrete footings (check local frost line depth, usually 2–4 feet), bolt on beams, and attach rafters. Permits vary by jurisdiction: check whether your patio requires one.
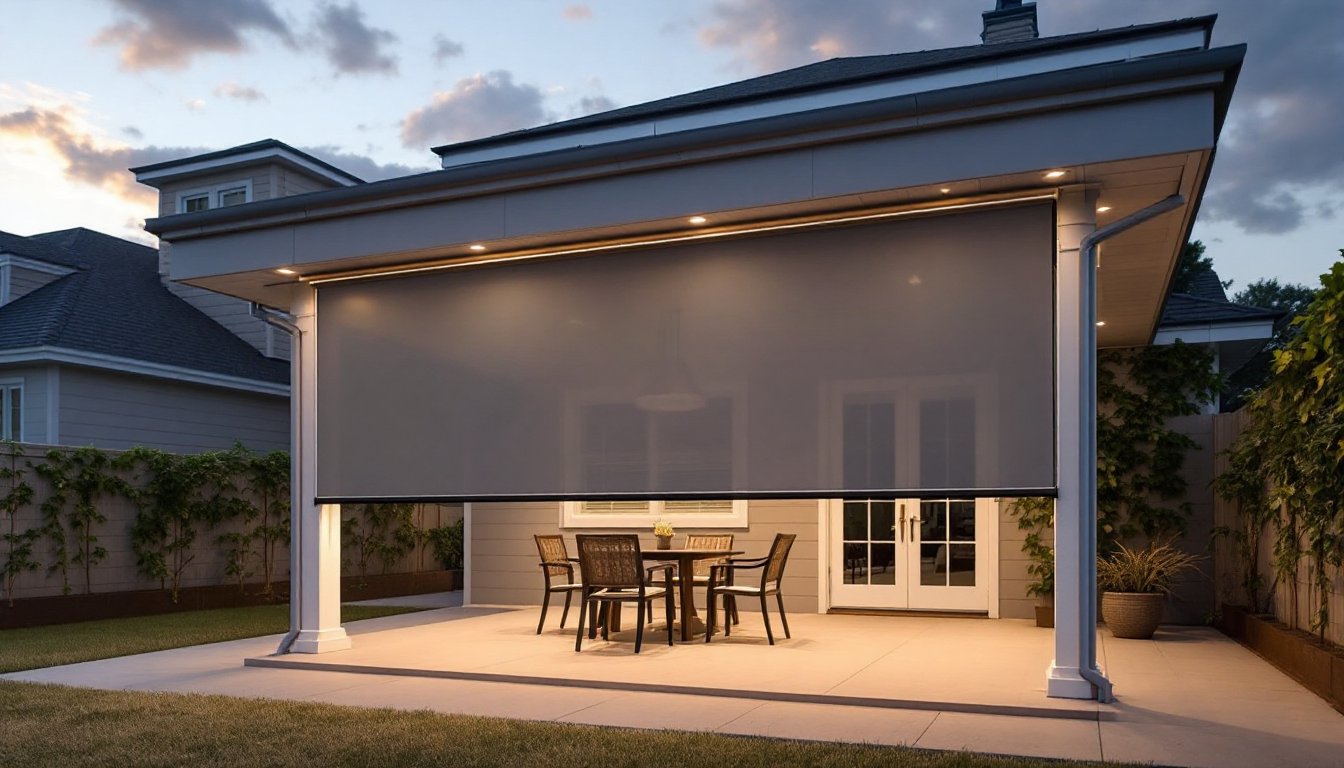
Solid roofs, whether metal panels, polycarbonate, or asphalt shingles, block weather entirely and hold their own structurally. They’re heavier and require deeper footings, proper load calculations (account for snow load in your region), and more robust framing. Most jurisdictions require a permit for solid patio covers because they’re structural additions. If you’re not confident with engineering and local code, hire a contractor for the frame. The payoff is a true outdoor room: weatherproof, suitable for heating or cooling, and usable year-round.
The middle ground, louvered or adjustable panels, gives flexibility. You close them for rain, open them for breeze. Cost sits between pergolas and solid roofs, and installation complexity is moderate.
Materials and Durability Considerations
Material choice determines how often you’ll maintain your patio cover and how long it lasts. Wood, metal, vinyl, and composite all work, the right pick depends on your climate, budget, and how hands-on you want to be.
Pressure-treated wood (typically rated for 15–20 years) is affordable and classic. Use Grade A or B lumber for visible framing. Protect it yearly with a water-resistant stain or sealant: skip this and you’ll see rot in 5–7 years. Western red cedar and redwood resist rot naturally but cost more. Expect to reapply finishes every 2–3 years. Wood also requires annual inspections for insect damage and splintering.
Aluminum is lightweight, won’t rot, and requires minimal maintenance, just occasional cleaning. It doesn’t have the warmth of wood, and it dents if hit hard. Cost runs moderate. Steel is stronger but rusts without proper paint or powder coating. Use only if you’re committed to touching up exposed areas.
Polycarbonate panels (clear or tinted) are durable, UV-protected, and let light through. They yellow slightly over time and require cleaning to prevent algae buildup in humid climates. Metal roofing panels (corrugated or standing seam) last 40+ years, shed water reliably, and require almost no maintenance. They’re louder in rain unless you add insulation underneath.
Composite materials blend wood fibers and plastic, offering wood’s look with lower maintenance. Cost is higher upfront but payoff is real: no staining, no rotting. Verify UV resistance in product specs if you’re in a sunny area. Climate matters: hot, humid regions favor low-maintenance materials like metal or aluminum: cooler, drier climates tolerate wood longer.
Check load ratings carefully. Solid roofs must handle snow load, which varies from 20 pounds per square foot in mild climates to 100+ psf in snow country. Your design and post spacing depend on this number.
Layout and Space Planning for Maximum Function
Smart layout turns a patio from a nice-to-have into a space people actually live in. Start by measuring your site and noting how sun moves across it at different times of day. Morning sun feels great: afternoon sun (especially west-facing) can be brutal. Shade timing drives cover height and orientation.
Dimensions matter. A patio under 12×12 feet feels tight for furniture and entertaining. 16×16 is comfortable for a table and chairs with room to move. 20×20 lets you zone the space, maybe dining on one end, a lounge area on the other. Standard post spacing for pergolas or frames runs 8–12 feet: anything wider requires cross-bracing or engineered support.
Headroom is critical and code-restricted in some jurisdictions. Most building codes require minimum 7 feet 6 inches clearance from floor to roof framing for habitable structures. Patios often get a pass at 7 feet, but verify locally. If you’re tall or planning to hang ceiling fans, shoot for 8 feet.
Door and walkway access should be intuitive. If the patio’s a detour from your main living area, it’ll get less use. Direct sightlines from inside your home make the space feel connected. Avoid putting a post right in the middle of the seating area, poor placement kills function. Plan furniture placement during design, not after building.
Edges need finishing. A border of composite decking, pavers, or stone gives definition and makes the space feel intentional. Drainage around the perimeter prevents water pooling and erosion. If your patio is on sloped ground, tier it or add a retaining edge.
Consult Houzz for patio layout inspiration if you’re unsure where to start. Browse real patios in your climate and note what works.
Lighting and Ventilation Essentials
A covered patio without light feels like a cave at dusk. Without ventilation, it traps heat and becomes unusable in summer. Both deserve planning from the start, not as afterthoughts.
Lighting options include recessed soffit lights, pendant fixtures, or strip lighting under beams. Recessed lights blend into soffits cleanly but require framing access during construction. Pendants add style and are easy to install after. Plan for two circuits: one for ambient mood lighting, another for task lighting near dining or work areas. String lights (Edison bulbs, fairy lights) are popular, but hardwired fixtures deliver more reliable brightness when you need it. Run electrical conduit during framing: adding it after is messy. Most patios need 8–12 watts per square foot of ambient lighting: task areas need more.
Ventilation keeps your patio comfortable and prevents moisture damage to the structure. If your cover is solid or mostly closed, airflow is essential. Options include ceiling fans (10–15 watts, modest cooling), cross-ventilation gaps left at the edges, or louvered panels that open partially. In humid climates, even small vents along the sides help. A south-facing open wall or patio door orientation maximizes natural breeze.
If you’re adding a fire feature (outdoor fireplace or pit), coordinate that with ventilation, smoke needs somewhere to go. Gas fires require less venting than wood, but ensure no backdraft into your home.
Electrical and HVAC work often requires a licensed electrician or contractor, depending on local codes. DIYers can handle cosmetic fixtures once rough-in is done, but new circuits and panel work should go to a pro. Ventilation ductwork (if you’re considering a heat pump or AC for year-round use) is similar, hire it out unless you have experience.
Budget-Friendly Design Tips for DIY Enthusiasts
Building a covered patio doesn’t require a contractor budget, but it does require smart choices and honest assessment of your skills.
Start modular. Build a basic pergola first (around $1,500–$3,000 for materials on a 12×16 foot deck, depending on wood grade and region). Add panels, a roof, or other upgrades in phases. This spreads cost and lets you test the space before going all-in.
Simplify the design. Decorative lattice, curved beams, and ornate details look great but multiply labor. A clean rectangular frame with simple rafters costs half as much to build and still looks professional. Add visual interest with paint color or climbing plants instead.
Use affordable materials strategically. Pressure-treated lumber for hidden structure, stained finish for visible beams. Metal roofing or polycarbonate panels cost less than tile or slate. Composite edging adds polish without breaking the budget. You don’t need premium everything, prioritize durability where it matters (roof, posts) and aesthetics where you’ll see it (facing beams, edge trim).
Do the labor yourself where you can. Posts in concrete, basic framing, and finishing (staining, painting) are DIY-friendly if you have basic carpentry skills. Structural engineering, electrical, and any load-bearing modifications should go to a pro. Most DIYers can handle a simple pergola in a weekend with a helper: solid roofs and systems requiring permits typically need pros.
Plan around weather. Building in spring or fall (mild temps, less rain) beats summer heat or winter cold. Rushing in bad weather leads to mistakes and costly fixes.
Discover more covered patio design ideas at Sunset Magazine for budget-conscious and creative approaches from designers nationwide.
Conclusion
A well-designed covered patio returns value in daily living, it extends your usable space, creates a gathering spot, and shields you from the elements. Focus on choosing a cover style that fits your use, picking durable materials for your climate, and planning layout and utilities upfront. Start simple, build smart, and add refinements over time. Your patio will reward you with years of outdoor living.